Defeating Censorship - Setting Up A Website On The Dark Web
DEFEATING CENSORSHIP - SETTING UP A WEBSITE ON THE DARK WEB
The party of tolerance has made it very clear that they intend to deplatform, censor, silence and even imprison conservatives. If we don’t act proactively, they will succeed. We believed that they would not take down President Trump with a stolen election, yet they have. We believed that justice would be served, and that the deep state, and everything it represents, would finally, FINALLY pay for their crimes against the American people, face the music for their treachery, and be held accountable for their treason.
I believed it. Many Americans believed it. But evidently not enough. Now, those in power, along with those who have come back into power, will do everything possible to silence dissent. This is what communists do. This is what communism is. It has poisoned our country and the whole world.
So, you already know this. Everyone knows this. Now it is time to push forward with alternatives, since the kingmakers will not permit us to speak against them on their platforms. This is fine, because it removes the shackles of our own ignorance and allows us to learn how to circumvent their rule and live free. This article will show us one way to do this.
Your computer is a very powerful weapon of information against those who seek to silence us. Now it’s time to learn how to use it to defeat censorship. This will be a tutorial on how to set up your own website/blog, that cannot be taken down by your web host, because YOU are the web host. Your domain name cannot be seized by powerful government forces because it is not registered with ICANN. This is what is known as a dark web website, accessible through the TOR network. Even tracing the signal to your computer will be very, very difficult, and you are going to keep a backup of it, to be installed elsewhere, in case they somehow do trace it back to your computer. We will detail the steps to do this, and if you follow them correctly (don’t worry, it’s so easy a caveman can do it) you will have your website up in a couple of hours. Even if you’ve never built a web page before, you will be able to do this, and as you create it, refine it, and hone your skills, you will also be speaking your mind, sharing your ideas, and building a community of like-minded individuals working together, in a decentralized fashion, to bring the truth, and freedom, to everyone.
PROTECTING YOUR COMPUTER
The first step is critical. This tutorial should be followed in the order presented. Some assumptions will be made, but no matter what kind of system you use, you should very easily be able to have your website up in short order. It is essential you have a notebook and pen to make some notes as you perform the steps, so you can easily repeat them when it is time to update your site, add new content, etc.
It may be better to use a stationary, desktop computer for this purpose, but a laptop that you can leave on all the time will also work just fine. No matter what kind of operating system (OS) you use, whether it is Windows, Mac or Linux, you should be connecting to the internet through a VPN. This is a bit of software that encrypts your internet signal and makes it difficult to impossible for bad actors to intercept your internet traffic, or even see what you are doing online. This is especially important to protect your identity and your finances, but also to guard against spying on your activity. No doubt you have seen several VPN ads lately on TV, or listening to various podcasts. There are many companies to select from, and you might consider NordVPN and ProtonVPN. These are paid services, but generally quite affordable. Both NordVPN and ProtonVPN (a division of Protonmail) are hosted outside the United States, so they aren’t subject to the same disclosure laws as US-based VPN providers. This is one case (of very few) where “Made in America” is not better. Check out their websites, linked above, and subscribe to one of their services (or another based upon your research). Even if you never set up your own TOR website, you absolutely should encrypt your internet activity with a VPN in place. Even more important, be sure to set the “kill-switch” offered by these services, which will completely disable your internet connection in the event the VPN server goes down, thus keeping you protected.
Now, we’re going to use a rather unique Linux distribution for this tutorial, so if you do not have a VPN set up yet, no worries, as the OS we are using has that built in, along with the TOR connection. The distribution is known as Linux Kodachi, and you can download it from THIS LINK.
SETTING UP A VIRTUAL MACHINE
Most computers have at least 4GB of RAM, but 8 would be better. This needs to be set up on a computer that you will leave on all the time, since you will want your TOR site up all the time. It can certainly be an older computer that you no longer use, your daily driver, or even a laptop.
A Virtual Machine can best be understood as a “computer within a computer”. In other words, say you are running Windows, or a Mac. The virtual machine will be a completely independent operating system that runs within your main computer, kind of like having two computers in one. For the purpose of this tutorial, your virtual machine will be specifically for running your TOR website, although it can serve many additional functions.
This author runs a virtual machine called Virtualbox. You can download the software for your operating system here and install it on your computer… it is free software and very stable. Install the software per the instructions for your specific system, then on to the next step.
We’re going to install Linux Kodachi in Virtualbox. Linux Kodachi is an extremely secure and privacy-focused OS that is typically used as a live operating system, run from a USB drive. We, however, are going to actually install the OS in Virtualbox It is free, and comes with some excellent (and free) programs already installed. Download the ISO File of Linux Kodachi here… it is a large file, and depending on your internet speed, can take from a few minutes to several hours to download. Save it to your Downloads folder, and go get a cup of coffee.
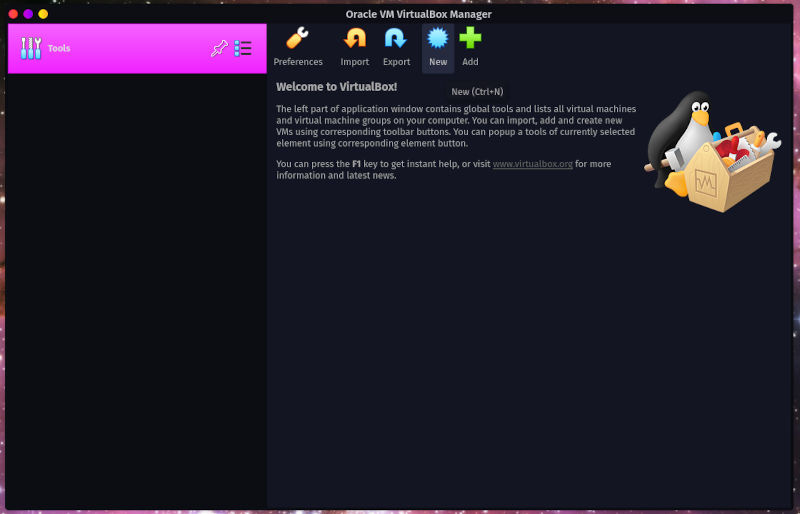
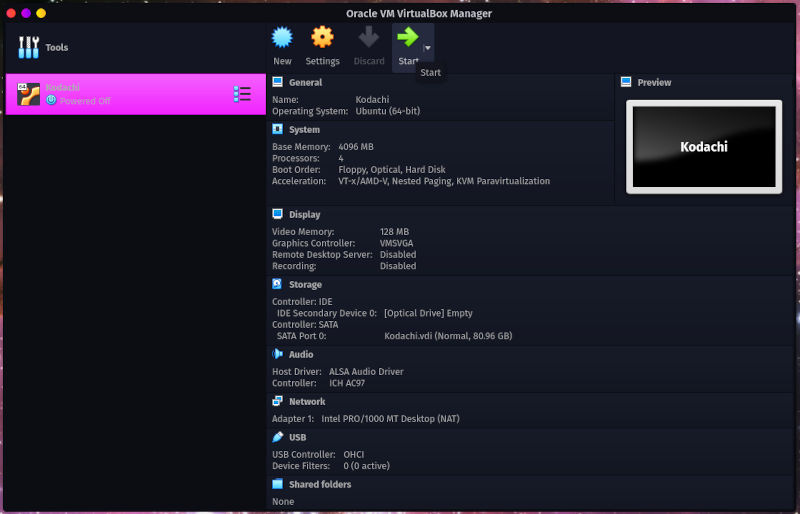
Now that you’ve downloaded the file, it’s time to install it in Virtualbox. Open your program menu, and type Virtualbox – it should come up as Oracle VM Virtualbox Manager. Once open, click New at the top. From the screenshots, you can see we selected Ubuntu 64 Bit as the OS (this is what Linux Kodachi is based upon). You may only get an option to install 32 bit OS’s… if this happens, do a quick search on DuckDuckGo on how to set up your system to run 64 bit Virtual Machines… you will find a solution based on your current OS that the Virtual Machine is operating within. Follow the prompts… I suggest a minimum of 4GB of memory (4096 MB). It will ask you to create a Virtual Machine… select create and use the default selections. Next you will ask how big to make the Virtual Hard Disk. 10GB is selected, but this will not be enough to install the OS… change to 20GB or more… when you need additional room it will allocate more space automatically.
Now it’s time to start the Virtual Machine.
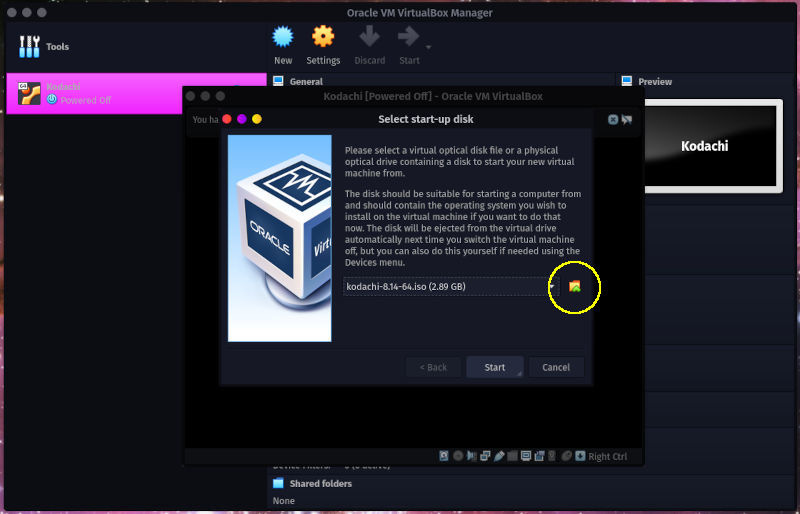
Click Start, where you will see a screen asking you to select the start-up disk. Click the folder icon to the right of the Host Drive VBOX CD-ROM, and navigate to the folder where your Linux Kodachi ISO file is located (probably Downloads). Select it, and finish by selecting Start.
Best suggestion is to watch it count down and start automatically. If all goes well you should see the Kodachi Logo as your system boots into the ISO. Be patient… it takes a few minutes to load from the virtual DVD.
You may notice that the screen is small. You can adjust this in Settings>Display from the main menu icon (bottom lower left). Double click on the icon Install_Kodachi_Offline.desktop. If you’re already running a typical Linux operating system, it will be the similar to your initial installation. If you’re running Windows, a Mac, or some other flavor of Linux, simply follow the prompts. Go ahead and select the box to install multimedia codecs… you’ll likely want them in the future, and better to just install them now.
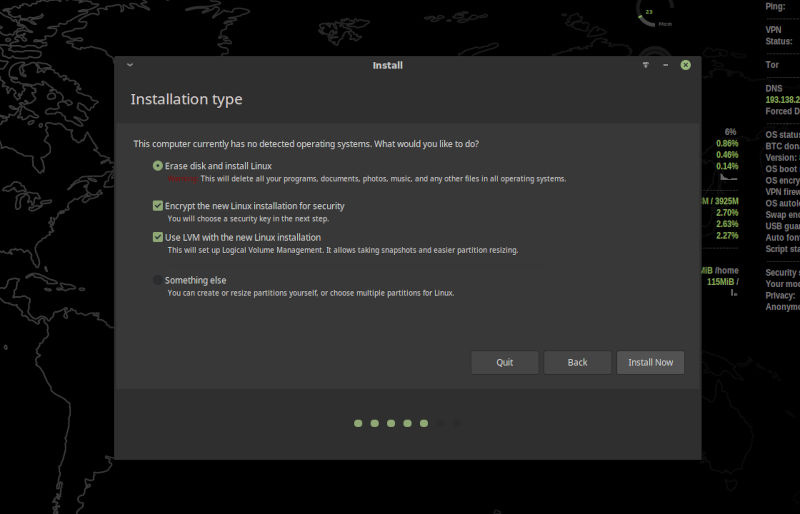
The next screen is kind of scary… it will ask you if you want to erase the disk and install Linux Kodachi. Don’t worry, it will be installing it on your virtual drive that you created earlier. You may also wish to encrypt the installation… this is recommended. Click Install Now. Select your time zone, or choose a random time zone, select your name (I suggest Kodachi) and a strong password, and complete the installation. Once finished, it will ask you if you wish continue testing, or restart. Select restart, and you will be good to go. It will ask you to remove the installation medium, then press enter. Just press enter.
One more thing that you can do that may be helpful, is install the Guest Additions once you have rebooted if they did not already install. This will give you more options for screen size.
After installation is complete and you have rebooted, you may see a screen indicating that installation is completing and will reboot momentarily. Allow it to do this. It will reboot and you are ready for the next steps.
Next step is to perform all of the updates. Because this is a new install, there will be a lot of them. Be patient, you’re almost ready to set up your TOR Server.
To perform the updates, you’re going to use the terminal. Ouch! What did he say? It’s easy. The terminal is in the lower left side with a couple of other panel applets. Mouse over them until the words Terminal Emulator show up, and click on that. A gray semi-transparent screen will appear. If you have never used the terminal before, this will be good practice.
Open the terminal and type the following:
sudo apt update
Once that has cycled through, type the following:
sudo apt upgrade
You will face a screen with a lot of updates, and it you ask you if you want to continue. Type the letter “y” and hit enter.
Time for another cup of coffee.
Now you can watch the progress. Once this is complete, restart your computer. Type the following in the terminal:
reboot
This is good practice you you to become accustomed to the terminal. It’s not difficult, and there are thousands of tutorials online if you ever get lost, or simply want to learn more.
Once your computer has rebooted, you are ready to install the TOR Server. By default, TOR is already installed in Kodachi. Let’s get started!
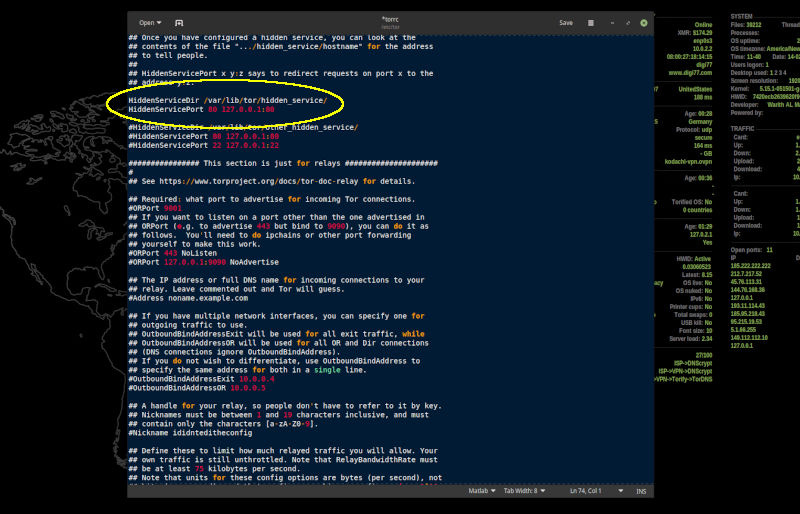
First we need to configure the torrc file located in etc/tor/torrc:
Type the following in the terminal:
sudo gedit /etc/tor/torrc
This will open the torrc file for editing. Now, remove the hashtag from the two lines circled, so they look like this:
Click save and close the file.
Now restart Tor by typing the following in the terminal:
sudo service tor restart
It will ask you for your password, so enter it.
Now it’s time to install a web server. This is also easy:
Open your terminal and type the following:
sudo apt install nginx
Confirm the installation by pressing “y” for yes.
Now you need to know what your .onion address is. Type the following:
sudo cat /var/lib/tor/hidden_service/hostname
You will receive a string of characters followed by .onion… this will be your .onion address. Right click on the line and select copy, then save it to a file for future use.
Now it’s time to edit your index.html page and set up your website. The easiest way to do this is simply to navigate to the page as follows:
sudo gedit /var/www/html/index.html
It may be more convenient to simply open the www folder as root. To do this you double click on File System on your desktop, then open var, then right-click on www and select Open as Root. Be careful not to delete the html folder or the index.html file inside. You might right-click inside the window and create a new folder, and call it backup or something like that, then copy the html folder into it.
WARNING: BE VERY CAREFUL WHEN YOU ARE NAVIGATING IN ROOT… YOU CAN BREAK YOUR SYSTEM AND YOU WILL HAVE TO REINSTALL KODACHI.
Now you have a hidden service website. Edit your index.html to create a new page. You might try something like this:
<!DOCTYPE html>
<html>
<head>
<title>Welcome to My Hidden Site</title>
</head>
<body> This is the first line of my hidden website. Now it is time to edit!</body>
</html>
If you have done everything correctly, you will be able to open your page in the TOR Browser. You can also open it in Chrome or Brave by copying the url, select Shift+Alt+N and pasting the url into the address bar. You will be notified that the url cannot be found, but you will also see a TOR button to the right of the address bar… click the button and it will redirect via TOR. You may also get notification that the website is not secure… this is because it uses the http:// and not the https:// protocol, but TOR by default is secure, so it’s okay to proceed.
Congratulations! You now have a hidden website, and as long as your computer is on, you will be able to access your site from anywhere, and others will be able to access your content with the url you saved.
BUILD YOUR SITE
Now you can start to build your site. If you just want a simple site, and you are familiar with html, you can easily add to the site you just created. For more complex static sites, you can use a wysiwyg editor (What You See Is What You Get). If you are using Linux, the most reliable editor I have found is Seamonkey, which is a Mozilla product. You can GET IT HERE.
Wordpress and Joomla are CMS platforms for making more complex websites. The use of one of these is beyond the scope of this article because of the way the files are served. However, a simple and elegant (and free) option is to use an html CMS platform, which can then be saved into your varwww/html/ directory. The site in which this article was originally published was built with Publii, which can be downloaded at
It is straightforward to use, and can be set up in a couple minutes. Either download the AppImage or the .deb file, either is fine. To install the .deb file, you will need to use the terminal as the deb installer on Kodachi does not always work for downloaded files. To do this, save the file to your Downloads file, then type the following in the terminal:
cd Downloads
sudo dpkg -i Publii-0.38.3.deb
If the download is a different version than above, simply modify the version. Once installed access the menu (icon bottom left) and the program will be in the Development submenu. You’ll want to read the Publii License Agreement, and if you agree, click “Accept”. The following screen will ask for your Website name and Author name. Fill those in and click Create website.
You are now ready to build your site. You may want to set up your Server first… you can use FTP, SFTP, or whatever you choose. I selected Manual, because I simply update the website and then import the files directly into the var/www/html/ directory. The most important part of this is to input your saved .onion address in the Website URL field. Use http:// for your prefix. This way your links will work correctly. Once you have built your site and added some pages, at the lower left corner of the window is a button that says “Sync your website”. Be sure to click on that when you are ready to publish. Unless you selected a different directory, your files will be saved in Documents>Publii>Sites. You’ll open your site and select the “output” folder. Copy the files and folders in that directory and paste them into your var/www/html/ directory (using root as explained above). Now your site should appear in a TOR browser on any computer in the world.
The Publii website has tutorials for using the program, and you can add images, logo, banner, and determine many details. There are also additional themes to download and test out.
Use your newly-created Hidden Website for good purposes. Use it for advancing freedom. Use it for speaking out against censorship, deplatforming and tyranny. Use it to spread the word about decentralization. You are welcome to link to or use this article with attribution to Hammer’s Thor and a link to this site.
You can also view this article on the Dark Web with this link: http://gn2ntjrkgbeffmjfjo5opvpuxykuho4275pmjetgpcpunbv6s3xjusid.onion/defeating-censorship-setting-up-a-website-on-the-dark-web/
It will require the TOR Browser or a TOR Window in Brave Browser.


Lots of people pointing out problems. Glad to see someone discussing peaceful solutions.
For the past two years we have been trying to find solutions to our biggest problem: THE CORRUPTION OF THE SYSTEMS THAT GOVERN OUR LIVES.
Is it solvable? Yes of course. All problems that do not defy the laws of physics are solvable.
This took us 2 years to write this. How to fix corrupt government in 3 simple steps:
https://open.substack.com/pub/joshketry/p/how-to-fix-corrupt-government-in?r=7oa9d&utm_medium=ios&utm_campaign=post
That is a substantial article... will delve into it when I have a bit of time to read it all. In the meantime, sharing on our Gab page: https://gab.com/hammersthor/posts/111627180060253074